Thursday 16 June 2016
June 2016 CU for SharePoint Server 2013 adds Cloud Hybrid Search capability to SharePoint 2013
The June 2016 Cumulative Update for SharePoint Server 2013 which
was released on June 14, 2016 adds Cloud Hybrid Search capability to SharePoint
2013. By using cloud hybrid search all crawled content including on-premises content
is indexed in search index that resides in Office 365 SharePoint Online. When
users perform a search the get results from both on-premises and Office 365
content.
To know more details about
the June 2016 CU for SharePoint 2013 visit https://support.microsoft.com/en-us/kb/3115174
Tuesday 14 June 2016
Redesigned Site Contents page in SharePoint Online
The redesigned
SharePoint Online Site Contents page that provides details on activities
happening on the site like site visit counts and trending contents, has started
rolling out to first release customers. This blog explains the different
sections that you would see on the new site contents page
Site visits
Site visit
section shows the number of visits to the site within the last 7 days. The
section also gives an indication of percentage change in the number of visits
to the site.


Trending content section shows the popular items in the
site over a rolling period of two weeks. Documents that are popular are listed
along with number of views.

Contents
Contents tab
lists all the lists and libraries within the site with details on number of items,
type and modified date. Clicking on the ellipses (…) would give you menu
options to go to list\library settings page or to the app details page.

Subsites
Subsites tab lists all subsites within the site with
details of number of views, created date and modified date. Clicking on the ellipses
(…) would give menu option to view site contents page of the subsite.

Top Navigation Panel
Top Navigation panel on the new site contents has the
below links
1. New – Provides link to create a new list, library, subsite or app.
2. Site workflows – Navigates to the site workflows page.
3. Site Settings – Navigates to the site settings page.
4. Recycle bin – Navigates to the recycle bin page.
Friday 3 June 2016
Developing a simple Expense Approval App with SharePoint, PowerApps and Flow
As part of the Future
of SharePoint event Microsoft announced Flow
and Power Apps integration with SharePoint.
Though the ability to create PowerApps and Flows directly within
SharePoint lists will be available only on the upcoming releases we could still
create PowerApps and Flows that connect to SharePoint Online lists through the
PowerApp and Flow designers. In this blog we will see an example of a simple expense approval
app that uses SharePoint Online lists, PowerApps and Flow
Setting up the Expense Entry
List
Create a custom list in SharePoint online site with the below
columns
1. Expense Title
2. Expense Date3. Expense Amount
4. Status
Developing Expense Entry
PowerApp
1. If you have not signed for PowerApps yet sign up from https://powerapps.microsoft.com/en-us/tutorials/signup-for-powerapps/
2. Install PowerApps studio for windows from https://www.microsoft.com/en-us/store/apps/powerapps/9nblggh5z8f3
3. Open PowerApps studio and sign in with your account.
4. From the left navigation click New and under the Create an app
from your data section select SharePoint Online – Phone layout.

5. Click Add button in Connections section and from the list of
connection types that shows up select SharePoint Online and click Connect
button.

6. In the Connect to a SharePoint Site input section enter the URL of
the SharePoint Online site containing the Expense list and click Go.
7. When prompted for login enter the credentials for SharePoint
Online site.
8. This will bring up the lists available in the site, from which
select Expense Entry list which was created earlier and click Connect.
9. You will be prompted to save the PowerApp, do so by giving a valid
name for the app.
10. The app would be created with three screens
a. Browse screen – Lists all the expense entries
b. Detail screen - Shows
details of a particular expense entry
c. Edit Screen – Form for editing\creating expense entry
11. Save the app and close PowerApps studio.
Developing Expense Approval Flow
2. Click on My flows from the top navigation and click Create new
flow button
3. Within the flow designer in the “How would like to start” input
select “SharePoint Online – When a new
item is created” option.

4. In the configuration form that shows up enter the URL of the
SharePoint site where the expense list resides and in the List name input
select the expense list.

5. Click + button at the bottom to add next step to the flow and
click Add an action button.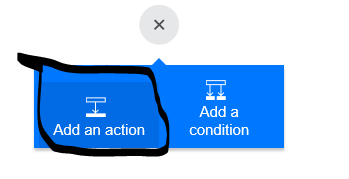
6. In the “What would like to do next” input select “Office 365 Users Get manager” option.

7. For User field input in Get manager step select “Created by Email”
from outputs from the previous step.

8. Click + button at the bottom to add next step to the flow and
click Add an action button.
9. In the “What would like to do next” input select “Send approval mail” option.

10. Sign in to Office 365 using your credentials.
11. For Subject field input in Send approval mail step enter “Expense
Approval Request” and select “Created by Display Name” from outputs from the
when new item is created step.
12. For To field input in Send approval mail step select “Email” from
outputs from the Get manager step.
13. For Body field input in Send approval mail step select “Title” and
“Expense Amount” fields from outputs from the when new item is created step.

14. Click + button at the bottom to add next step to the flow and
click Add an action button.
15. In the “What would like to do next” input select “SharePoint Online – Update Item” option.

16. In the configuration form that shows up enter the URL of the
SharePoint site where the expense list resides and in the List name input
select the expense list.
17. For Id field input in SharePoint Online – Update Item step select
“ID” from outputs from the when new item is created step.

18. For Status field input in SharePoint Online – Update Item step
select “SelectedOption” from outputs from send approval mail step.

19. Click + button at the bottom to add next step to the flow and
click Add an action button.
20. In the “What would like to do next” input select “Send email” option.
21. Sign in to Office 365 using your credentials.
22. For To field input in Send email step select “Created by email”
from outputs from the update items step.
23. For the Subject and Body field input in Send email step enter
“Your expense has been “and select “SelectedOption” from the outputs from Send
approval mail step.

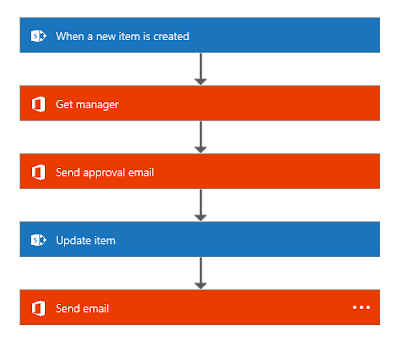
24. Give a name for the flow and click Save button to save the flow.
25. The final flow would like the one shown in image below
Power App and Flow in action
1. Logon to web.powerapps.com and from My Apps list click on the
Expense App created.
2. Click on + link from top right of the Browse screen. This will
take you to the Edit screen.
3. Fill in the expense request details and save the record by
clicking tick mark at top right.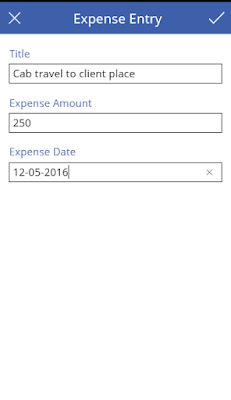
4. An approval request will be sent to the users manager.
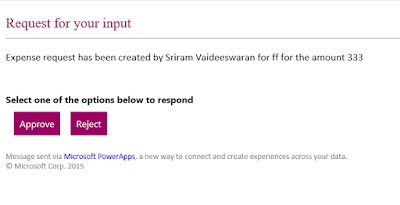
5. Once the manager approves or rejects the request an email
notification will be sent to the expense request creator and the status will be
updated in SharePoint expense list.
Subscribe to:
Posts (Atom)