Wednesday 28 December 2016

Smart filters in SharePoint list and Libraries


A smart filter option to filter list items and documents is being rolled out to SharePoint online tenants. Smart filters make it easy to find items with list or document library.

Working with Smart Filters

Open the smart filter pane by clicking on the filter icon at the top right of SharePoint list or library. For document libraries, 3 default filters options are available

 Modified: Filter documents based on modified date range

People: Filter documents modified by one or more people

Type: Filter documents based on document type such as Word, Excel etc.


For lists smart filter option is available for column types date, person and choice.


To clear the filters click the filter icon at the top right of the smart filter pane. Filtered items could also be saved as Views.

Friday 12 August 2016

Creating Power Apps with SharePoint on-premises data


Power Apps now supports creating an app from data stored in lists on a SharePoint 2013 and SharePoint 2016 on-premises site.

Below are the steps for creating a Power App based on on-premises data

1.      From the Power Apps studio  click New from the left navigation bar.

2.      Under “Create app from your data” select SharePoint.

3.      In the next screen select “Connect using on-premises data gateway” to connect to SharePoint on-premises.


4.      This would display additional fields for connection details.


5.      From the Authentication Type drop down choose your authentication type. Currently Windows and Basic authentication are supported for SharePoint on-premises.

6.      Provide user name and password for the connection.

7.      A gateway is required for creating an on-premises connection. If you don’t already have a gateway, you can create one by following the details listed here.

8.      Click “Connect” button to create the connection.

9.      In the connect to SharePoint site page enter the URL of SharePoint on-premises site and click Go


10.  This would display lists within the site. Select the list based on which you want to create the Power App and click Connect.

11.  The App screens with the fields form the list you had selected will be created.

12.  You can make required changes to the field and layout and save the App.

Note:

When you share a Power App that uses SharePoint on-premises connection, the gateway used by the SharePoint connection will also be shared implicitly.

Wednesday 3 August 2016

Modern List Experience in SharePoint Online


The modern experience for SharePoint announced in the Future of SharePoint Event will be starting to roll out to first release customers during in First week of August. Microsoft also has provisioned a method to get early preview of the modern list experience even before the First Release roll out by adding TryNewExperience=true query string to the list URL as specified in the article https://network.office.com/t5/Blogs/Modern-SharePoint-lists-are-here-Including-integration-with/ba-p/3027 .

New UI

The new UI for list is clean and has command bar instead of ribbons.


Information Pane

Clicking the information icon at the top right displays the information panel which lists the recent activities that happened on the list.


The information panel for a selected list item shows the list properties, recent activities and sharing information.


Edit Properties

Properties including attachments can be edited in the information panel


Bulk editing of list is made easy with the Quick edit option


Modifying List and Views

New columns can be easily added to the list by clicking the + icon


Columns can be renamed, reordered, sorted and filtered from the column context menu


Flow Integration

A flow can be created by clicking the Flow menu from the top and selecting Add a flow


Selecting a flow template would take you to flow designer with the list context.

Friday 15 July 2016

Fix for SharePoint Online Modern Document Libraries Displaying Blank Pages


The cool SharePoint modern document library page announced as part of Future of SharePoint became available in our Office 365 tenant recently. The new document library page was working fine for most of our users, some users where seeing a blank page when accessing the library. As the users were seeing a plain white page they were not able to accessible.

While trying to find the cause of the issue with the browser developer tools the below error was logged into the console window

AllItems.aspx:10 Uncaught ReferenceError: require is not defined

Looking into the network tab showed that request to the file https://spoprod-a.akamaihd.net/files/odsp-next-prod_ship-2016-07-04_20160711.001/require-951f856e.js failed.

The request failed because the domain spoprod-a.akamaihd.net was blocked in our firewall system. Once we the domain was unblocked in firewall the library page started working correctly.
The updated list of end points that a user should be able to connect for working in SharePoint online can be viewed from https://support.office.com/en-us/article/Office-365-URLs-and-IP-address-ranges-8548a211-3fe7-47cb-abb1-355ea5aa88a2?ui=en-US&rs=en-US&ad=US#BKMK_SPO

Monday 4 July 2016

Switching between classic and modern document library experience in SharePoint Online

As part of the Future of SharePoint event Microsoft announced Modern Document Library Experience in SharePoint. The modern document library experience is faster, simpler and mobile device friendly. This feature has been rolling to SharePoint online sites.


 Users can switch to classic document library view by clicking the Return to classic SharePoint link from the left navigation. A document library owner can switch the experience between modern and classic experience by selecting options from the library settings page.

1.      If the document library has classic view and you want to switch to modern experience, navigate to the library and select Library Settings from the Ribbon.

2.      If the document library has modern view and you want to switch to classic experience, navigate to the library and click Settings Icon from top right and click Library settings.


3.      In the Library settings page, click Advanced settings under the General Settings section.

4.      In the Advanced settings page, scroll down to List experience.


5.      Choose one of the options as detailed below

    1. Default experience set by my administrator – Choose this option if you want to set the library experience as the option set by SharePoint administrator.
    2. New experience – Choose this option to set the library experience to the modern experience.
    3. Classic experience – Choose this option to set the library experience to classic.

SharePoint Online administrators can also change the default experience for all document libraries from the admin center.

1.      Navigate to SharePoint Online Admin Center.

2.      Click settings from the left navigation.

3.      On the settings page select either Classic experience or New experience from SharePoint Lists and Libraries experience options


4.      Selected experience option will be applied to all libraries in the tenant.

Thursday 16 June 2016

June 2016 CU for SharePoint Server 2013 adds Cloud Hybrid Search capability to SharePoint 2013

The June 2016 Cumulative Update for SharePoint Server 2013 which was released on June 14, 2016 adds Cloud Hybrid Search capability to SharePoint 2013. By using cloud hybrid search all crawled content including on-premises content is indexed in search index that resides in Office 365 SharePoint Online. When users perform a search the get results from both on-premises and Office 365 content.


To know more details about the June 2016 CU for SharePoint 2013 visit https://support.microsoft.com/en-us/kb/3115174

Tuesday 14 June 2016

Redesigned Site Contents page in SharePoint Online


The redesigned SharePoint Online Site Contents page that provides details on activities happening on the site like site visit counts and trending contents, has started rolling out to first release customers. This blog explains the different sections that you would see on the new site contents page

Site visits

Site visit section shows the number of visits to the site within the last 7 days. The section also gives an indication of percentage change in the number of visits to the site.


Clicking the View report link in the top of Site visits box shows the Site report popup that gives details of site visits, new items added and trending content.


Trending content

Trending content section shows the popular items in the site over a rolling period of two weeks. Documents that are popular are listed along with number of views.

Contents

Contents tab lists all the lists and libraries within the site with details on number of items, type and modified date. Clicking on the ellipses (…) would give you menu options to go to list\library settings page or to the app details page.


Subsites

Subsites tab lists all subsites within the site with details of number of views, created date and modified date. Clicking on the ellipses (…) would give menu option to view site contents page of the subsite.


Top Navigation Panel

Top Navigation panel on the new site contents has the below links

1.      New – Provides link to create a new list, library, subsite or app.

2.      Site workflows – Navigates to the site workflows page.

3.      Site Settings – Navigates to the site settings page.

4.      Recycle bin – Navigates to the recycle bin page.


Friday 3 June 2016

Developing a simple Expense Approval App with SharePoint, PowerApps and Flow


As part of the Future of SharePoint event Microsoft announced Flow and Power Apps integration with SharePoint.  Though the ability to create PowerApps and Flows directly within SharePoint lists will be available only on the upcoming releases we could still create PowerApps and Flows that connect to SharePoint Online lists through the PowerApp and Flow designers.  In this blog we will see an example of a simple expense approval app that uses SharePoint Online lists, PowerApps and Flow

Setting up the Expense Entry List

Create a custom list in SharePoint online site with the below columns
1.      Expense Title
            2.      Expense Date
            3.      Expense Amount
            4.      Status


Developing Expense Entry PowerApp

1.      If you have not signed for PowerApps yet sign up from https://powerapps.microsoft.com/en-us/tutorials/signup-for-powerapps/

2.      Install PowerApps studio for windows from https://www.microsoft.com/en-us/store/apps/powerapps/9nblggh5z8f3

3.      Open PowerApps studio and sign in with your account.

4.      From the left navigation click New and under the Create an app from your data section select SharePoint Online – Phone layout.
 

5.      Click Add button in Connections section and from the list of connection types that shows up select SharePoint Online and click Connect button.

6.      In the Connect to a SharePoint Site input section enter the URL of the SharePoint Online site containing the Expense list and click Go.

7.      When prompted for login enter the credentials for SharePoint Online site.

8.      This will bring up the lists available in the site, from which select Expense Entry list which was created earlier and click Connect.

9.      You will be prompted to save the PowerApp, do so by giving a valid name for the app.

10.  The app would be created with three screens

a.      Browse screen – Lists all the expense entries

b.      Detail screen -  Shows details of a particular expense entry

c.       Edit Screen – Form for editing\creating expense entry

11.  Save the app and close PowerApps studio.


Developing Expense Approval Flow

 1.      If you have not signed for Flow yet sign up from https://flow.microsoft.com/en-us/

2.      Click on My flows from the top navigation and click Create new flow button

3.      Within the flow designer in the “How would like to start” input select  “SharePoint Online – When a new item is created” option.


4.      In the configuration form that shows up enter the URL of the SharePoint site where the expense list resides and in the List name input select the expense list.


5.      Click + button at the bottom to add next step to the flow and click Add an action button.
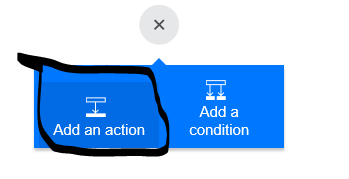

6.      In the “What would like to do next” input select  “Office 365 Users Get manager” option.


7.      For User field input in Get manager step select “Created by Email” from outputs from the previous step.


8.      Click + button at the bottom to add next step to the flow and click Add an action button.
9.      In the “What would like to do next” input select  “Send approval mail” option.


10.  Sign in to Office 365 using your credentials.

11.  For Subject field input in Send approval mail step enter “Expense Approval Request” and select “Created by Display Name” from outputs from the when new item is created step.

12.  For To field input in Send approval mail step select “Email” from outputs from the Get manager step.

13.  For Body field input in Send approval mail step select “Title” and “Expense Amount” fields from outputs from the when new item is created step.


14.  Click + button at the bottom to add next step to the flow and click Add an action button.

15.  In the “What would like to do next” input select  “SharePoint Online – Update Item” option.


16.  In the configuration form that shows up enter the URL of the SharePoint site where the expense list resides and in the List name input select the expense list.

17.  For Id field input in SharePoint Online – Update Item step select “ID” from outputs from the when new item is created step.


18.  For Status field input in SharePoint Online – Update Item step select “SelectedOption” from outputs from send approval mail step.


19.  Click + button at the bottom to add next step to the flow and click Add an action button.

20.  In the “What would like to do next” input select  “Send email” option.

21.  Sign in to Office 365 using your credentials.

22.  For To field input in Send email step select “Created by email” from outputs from the update items step.

23.  For the Subject and Body field input in Send email step enter “Your expense has been “and select “SelectedOption” from the outputs from Send approval mail step.


24.  Give a name for the flow and click Save button to save the flow.

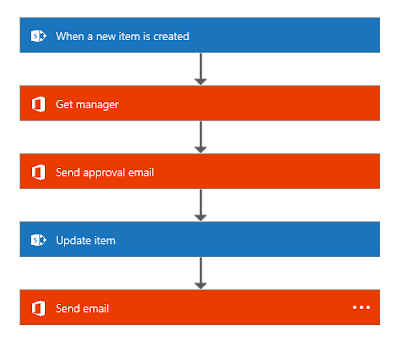
25.  The final flow would like the one shown in image below


Power App and  Flow in action

1.      Logon to web.powerapps.com and from My Apps list click on the Expense App created.

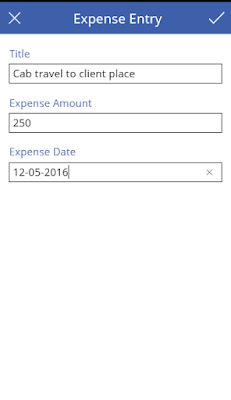
2.      Click on + link from top right of the Browse screen. This will take you to the Edit screen.

3.      Fill in the expense request details and save the record by clicking tick mark at top right.

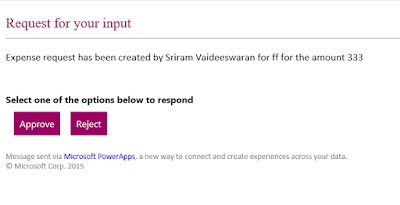
4.      An approval request will be sent to the users manager.

5.      Once the manager approves or rejects the request an email notification will be sent to the expense request creator and the status will be updated in SharePoint expense list.